Have you ever opened your rice cooker lid, eager for fluffy, perfectly cooked grains, only to find a sticky, mushy mess or, worse, hard, undercooked kernels? The secret to consistently delicious results isn’t just owning a rice cooker; it’s mastering the water-to-grain ratio. This comprehensive guide will transform your cooking, providing precise measurements and expert tips for every type of grain, ensuring your rice cooker delivers flawless results every time.
Understanding Your Rice Cooker and Why Ratios Matter
A rice cooker is a remarkably efficient kitchen appliance designed to cook rice and other grains by boiling water which is then absorbed. From basic on/off models to advanced fuzzy logic systems that adjust cooking based on grain type, these machines simplify meal preparation. However, their true potential is unlocked when you understand the science behind perfect grain absorption.
At its core, rice cooking is a process called gelatinization, where starch granules absorb water and swell, softening the grain. Too much water leads to oversaturated, mushy grains where the starch breaks down excessively. Too little water, and the starches cannot fully hydrate, resulting in hard, chalky centers. This delicate balance highlights why precise water ratios are absolutely crucial for achieving that ideal, fluffy texture. Without the correct ratio, even the most sophisticated rice cooker can struggle to deliver optimal results.
Perhaps the most common pitfall in rice cooker use stems from a simple, often overlooked detail: the measuring cup. Most rice cookers come with a small plastic cup, typically measuring 180ml, which is significantly smaller than a standard American or UK measuring cup (240-250ml). This “rice cooker cup” is the intended measurement for both rice and water, and the internal markings in your cooker’s pot are calibrated specifically to this 180ml volume. Using a standard cup instead will almost certainly throw off your ratios and yield inconsistent results. If you’ve lost yours, accurately measure 180ml with a kitchen jug to maintain precision.
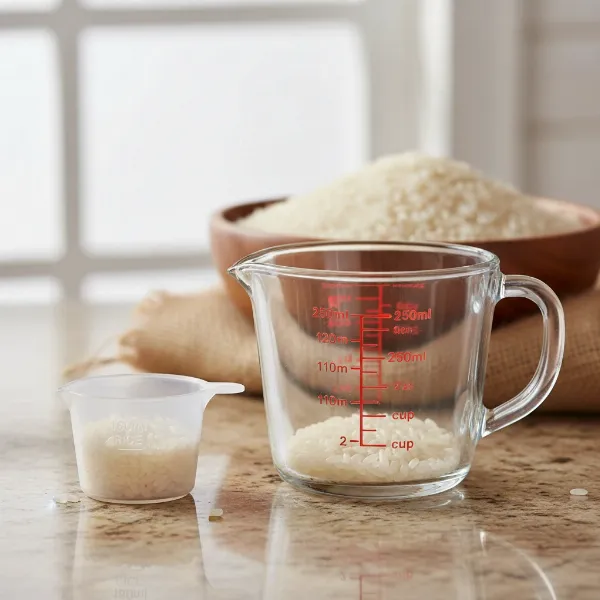 A close-up of a rice cooker measuring cup with a standard kitchen measuring cup, illustrating the size difference for water to grain ratios.
Essential Preparation Steps for Flawless Grains
Beyond just the water ratio, a few fundamental preparation steps can dramatically elevate the quality of your cooked grains. These techniques ensure optimal absorption, prevent stickiness, and contribute to the overall texture and taste.
Rinsing your grains is a non-negotiable step for most white rice varieties, especially jasmine and basmati. This simple process removes excess surface starch, which is the primary culprit behind gummy, clumpy rice. To rinse effectively, place your rice in a bowl or a fine-mesh sieve and run cold water over it, gently swirling with your hand, until the water runs mostly clear. Gently agitate the grains rather than scrubbing to preserve their integrity. Drain thoroughly for 10-15 minutes before adding your measured cooking water. However, there are exceptions: do not rinse enriched rice, as you’ll wash away added nutrients. For dishes like risotto using Arborio rice, the starch is desired for its creamy texture, so rinsing is omitted.
For many whole, harder grains like brown rice, wheat berries, or mixed grains, a pre-soak can be a game-changer. These grains have a tougher outer bran layer that slows water absorption. Soaking them for 20-30 minutes (or even longer for very hard grains like wheat berries) can help kick-start the softening process, leading to more tender and evenly cooked results. If you choose to soak, especially for longer durations, you might consider slightly reducing the cooking water to compensate for the absorbed moisture. For brown rice, soaking for 20 minutes before cooking is recommended to ensure an even texture.
Once your rice cooker finishes its cycle, resist the urge to immediately open the lid. A crucial step often overlooked is the resting period. Allowing the cooked grains to sit undisturbed on the “Keep Warm” setting for at least 10-15 minutes helps redistribute moisture evenly throughout the grains. This resting protocol prevents the top layer from drying out and the bottom from becoming too soggy or sticking to the pot. It allows the starches to set, resulting in fluffier, more distinct grains that are less prone to sticking together.
Your Comprehensive Guide to Water Ratios for Popular Grains
Achieving perfectly cooked grains in your rice cooker hinges on understanding that different varieties have unique water absorption needs. From delicate white rice to hearty whole grains, the right ratio is your key to success.
White Rice Varieties
|
Our Picks for the Best Rice Cooker in 2026
As an Amazon Associate I earn from qualifying purchases.
|
||
| Num | Product | Action |
|---|---|---|
| 1 | AROMA® Mini Rice Cooker, 2-Cup (Uncooked) / 4-Cup (Cooked), Grain Cooker, Soup Maker, Oatmeal Cooker, Auto Keep Warm, 1 Qt, Milk Tea color |

|
| 2 | COMFEE' Compact Rice Cooker, 6-in-1 Stainless Steel Multi Cooker, Slow Cooker, Steamer, Saute, and Warmer, 2 QT, 8 Cups Cooked(4 Cups Uncooked), Brown Rice, Quinoa and Oatmeal, 6 One-Touch Programs |
|
| 3 | AROMA Digital Rice Cooker, 4-Cup (Uncooked) / 8-Cup (Cooked), Steamer, Grain Cooker, Multicooker, 2 Qt, Stainless Steel Exterior, ARC-914SBD |
|
| 4 | Aroma Housewares 4-Cups (Cooked) / 1Qt. Rice & Grain Cooker (ARC-302NGBL), Blue |
|
| 5 | Instant Pot 4QT RIO Mini 7-in-1 Multi-Cooker, Pressure Cooker, Slow cook, Sauté, Steam, Rice Maker, Yogurt, & Warmer, Sea Salt, 4 Quarts |
|
| 6 | AROMA® Select Stainless® Rice Cooker, 3-Cup (Uncooked) / 6-Cup (Cooked), Stainless Steel Inner Pot, Small Rice Cooker, Auto Keep Warm, 1.2 Qt, White, ARC-753SG |
|
| 7 | AROMA® Mini Rice Cooker, 2-Cup (Uncooked) / 4-Cup (Cooked), Grain Cooker, Soup Maker, Oatmeal Cooker, Auto Keep Warm, 1 Qt, Light Green |
|
| 8 | BLACK+DECKER Rice Cooker 6-Cup (Cooked) with Steaming Basket, Removable Non-Stick Bowl, White |
|
| 9 | Zojirushi Micom 3-Cup Compact Size, Multiple Settings, Stainless Steel Made, Built-In Retractable Power Cord and Easy to Transport Rice Cooker and Warmer |
|
| 10 | COSORI Rice Cooker 10 Cup, 24h Keep Warm, Non-stick Ceramic Inner Pot, 18 Functions Fuzzy Logic Rice Maker with Stainless Steel Steamer Basket, Sauté, Slow Cooker, Black |
|
White rice, with its milled bran and germ removed, generally requires less water and a shorter cooking time than its whole-grain counterparts. However, even within white rice, variations exist. For Short-Grain White Rice, often used for sticky rice dishes and desserts, a ratio of 1:1.1 to 1:1.25 (rice:water) is ideal, with 1:1.1 often preferred for sushi rice to ensure optimal stickiness. Medium-Grain White Rice typically benefits from a 1:1.5 ratio. For Long-Grain White Rice, such as standard white rice, a ratio of 1:1.33 to 1:1.75 is commonly recommended, though some sources suggest 1:1.5.
Aromatic long grains like Jasmine Rice and Basmati Rice are celebrated for their delicate fragrance and fluffy, separated texture. For both, a common starting point is a 1:1.25 ratio (rice:water). However, some long-grain basmati might require a 1:2 ratio to cook properly and achieve distinctly separate grains. Rinsing these thoroughly is essential to remove excess surface starch and prevent clumping. For exceptionally long basmati grains, a 15-30 minute soak after rinsing can make a world of difference, but remember to slightly reduce the cooking water to closer to a 1:1 ratio if soaking.
Brown Rice
Brown rice is a nutritional powerhouse, but its intact bran layer makes it demand more water and a longer cooking time. For Long-Grain Brown Rice, a ratio of 1:2.25 (rice:water) is often recommended. For general Brown Rice (long or short grain), a 1:1.5 ratio with a 20-minute soak before cooking is a good starting point to achieve a tender, evenly cooked result. This extra liquid and soaking time are crucial for penetrating the fibrous bran and hydrating the grain thoroughly.
Beyond Rice: Other Grains
Your rice cooker isn’t limited to just rice. It can be a versatile tool for cooking a variety of other grains. For Quinoa, a popular complete protein, a 1:2 ratio (quinoa:water) is usually effective. Wild Rice, technically the seed of an aquatic grass, is quite thirsty and often requires a 1:2 ratio. For a Wild Rice Blend, a 1:1.75 ratio is a good starting point.
When venturing into other grains, remember their unique characteristics. For hearty grains like Farro, Barley, and Wheat Berries, pre-soaking is highly recommended to reduce cooking time and ensure tenderness. For instance, wheat berries can be soaked for an hour, then cooked with a 1:2 ratio of grain to water. For Oats (for porridge), ensure you don’t fill the cooker more than halfway, as oats tend to bubble up significantly. You can even combine Lentils with Rice; a common ratio for equal parts rice and lentils would be approximately 1:2.25 total dry ingredients to water (e.g., 1 cup rice + 1 cup lentils to 4.5 cups water).
The following table offers a quick reference for common grains:
| Grain Type | Recommended Ratio (Grain:Water) | Key Notes |
|---|---|---|
| White Rice | ||
| Short-Grain White | 1:1.1 – 1:1.25 | For sushi, use 1:1.1 for ideal stickiness. |
| Medium-Grain White | 1:1.5 | Good for everyday use, slightly chewy. |
| Long-Grain White (General) | 1:1.33 – 1:1.5 | Versatile for many dishes. |
| Jasmine Rice | 1:1.25 | Rinse well. If soaking, reduce water to approx. 1:1. |
| Basmati Rice | 1:1.25 – 1:2 | Rinse thoroughly. Soak for 15-30 mins for distinct grains, then adjust water. |
| Sushi Rice | 1:1 | Rinse until water is completely clear. |
| Parboiled/Converted Rice | 1:2 | No rinsing needed, holds shape well. |
| Brown Rice | ||
| Brown Rice (General) | 1:1.5 | Soak for 20 mins to soften bran for even texture. |
| Long-Grain Brown Rice | 1:2.25 | Requires more water and longer cooking due to bran. |
| Other Grains | ||
| Quinoa | 1:2 | Rinse well before cooking. |
| Wild Rice | 1:2 | Check package instructions; requires longer cooking. |
| Wild Rice Blend | 1:1.75 | Add 15 mins resting time after cooking. |
| Arborio Rice | 1:2 (with broth) | Do not rinse. Best in multi-cookers with risotto function. |
| Wheat Berries | 1:2 | Soak for 1 hour before cooking for best results. |
| Oats (Porridge) | Varies | Do not fill cooker more than halfway to prevent bubbling over. |
| Farro, Barley, Bulgur (mixed) | 3:1 (water:grain) | Soak tougher grains beforehand. |
| Rice & Lentils (mixed) | 2.25:1 (total dry:water) | E.g., 1 cup rice + 1 cup lentils to 4.5 cups water. |
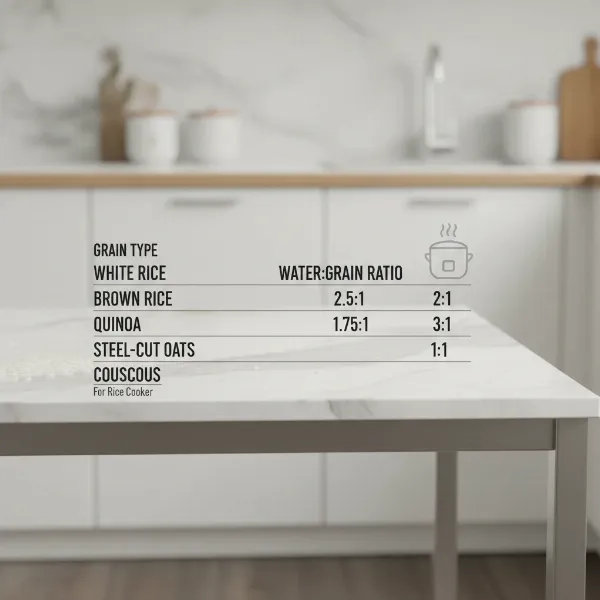 A visually appealing table showing various grain types and their recommended water ratios for rice cooker cooking.
Fine-Tuning Your Rice: Advanced Tips and Troubleshooting
Even with precise ratios, achieving your ideal grain texture can sometimes feel like an art form. Factors beyond simple measurements play a significant role, and knowing how to troubleshoot common issues will turn you into a rice cooker pro.
Adjusting for Personal Preference and Variables
The “perfect” texture is often subjective. Do you prefer firmer grains for a stir-fry, or a softer, more delicate bite for a simple side? You can easily fine-tune your results. For firmer grains, try reducing the water by about 1-2 tablespoons per 180ml cup of rice. This helps each grain remain separate. Conversely, for softer grains, add an extra 1-2 tablespoons of water per cup. Always start with small adjustments, as even a spoonful or two can make a noticeable difference.
Beyond personal taste, other variables impact water absorption. The age of your rice is a significant factor; newer harvests contain more moisture and may require slightly less water than older, dried-out grains. Your specific rice cooker model also matters, as some basic models may allow more steam to escape than high-tech, sealed pressure cookers. If you live at high altitudes, lower atmospheric pressure means water boils at a cooler temperature, requiring more water (try adding 10-15% more) and longer cooking times to achieve tenderness.
The Traditional Fingertip Method
While precise measurements are generally recommended, many experienced home cooks, particularly in Asian cultures, rely on an intuitive technique known as the fingertip method. This traditional shortcut offers a surprisingly effective way to gauge water levels without a measuring cup. After rinsing and leveling your rice in the cooker’s pot, gently place the tip of your index finger so it just touches the surface of the rice. Pour in water until the level reaches the first knuckle (or joint) of that finger for white rice, and sometimes the second knuckle for brown rice. This method inherently adjusts to the amount of rice in the pot, making it a reliable guide for many.
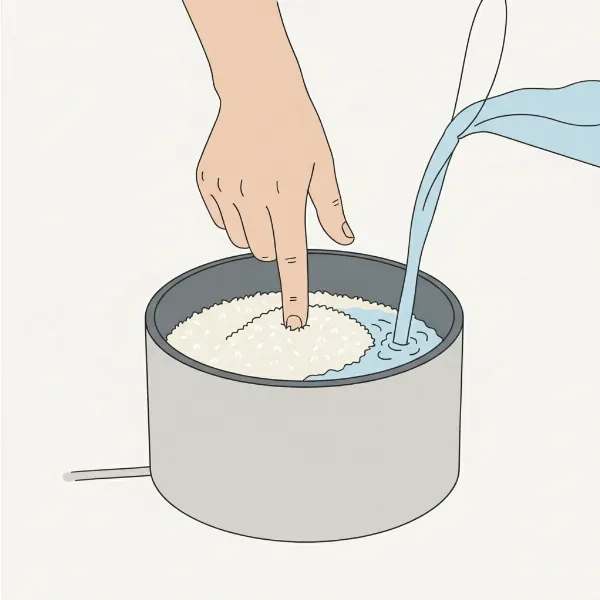 An illustration demonstrating the traditional fingertip method for measuring water in a rice cooker.
Fixing Common Rice Cooker Mistakes
Even with careful preparation, issues can arise. Knowing how to diagnose and fix common rice cooker mishaps can save your meal.
If your rice turns out mushy or soggy, it’s almost always due to too much water. The grains have become waterlogged. While you can’t restore fluffiness, you can spread the rice thinly on a baking tray and air-dry it or gently bake it at a very low temperature (around 150°C/300°F) for 10-15 minutes to evaporate some excess moisture. Mushy rice is also perfect for repurposing into congee, rice cakes, or even fried rice.
Conversely, hard or undercooked rice indicates insufficient water. The grains didn’t fully hydrate. The easiest fix is to add a splash of hot water (2-4 tablespoons per cup of dry rice initially used), put the lid back on, and let the cooker sit on the “Keep Warm” setting for another 10-15 minutes. The extra steam and gentle heat will typically finish the cooking process. Avoid lifting the lid too early during cooking, as this releases crucial steam.
To prevent a burnt bottom layer or sticking, always rinse your rice thoroughly to remove scorching-prone surface starch. Adding a small knob of butter or a teaspoon of oil to the water can also create a protective, non-stick layer. After cooking, allowing the rice to rest on “Keep Warm” for 10-15 minutes helps evenly distribute moisture, making it less likely to stick when fluffed.
Elevating Flavor
For an instant boost of deep, savory flavor, consider using broth instead of water. You can swap in chicken, vegetable, or beef broth for the water your recipe calls for, using the exact same ratio. Just be mindful of the salt content; most store-bought broths are already seasoned, so you’ll likely want to reduce or omit any additional salt you’d normally add. This simple swap can transform a plain side dish into a flavorful component of your meal.
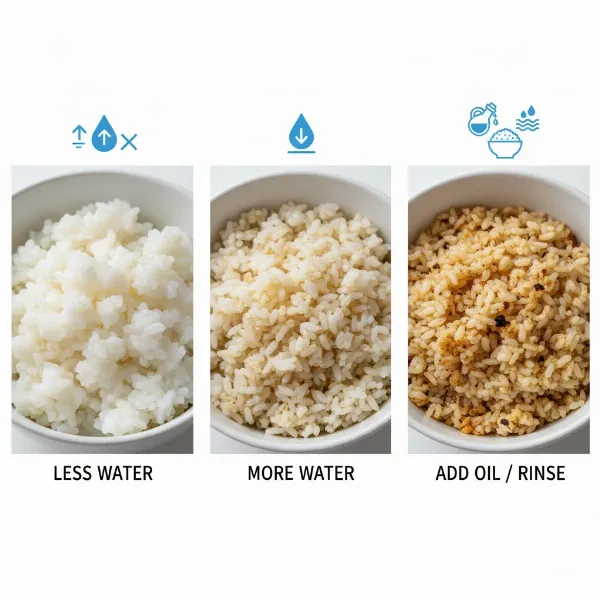 A graphic illustrating common rice cooker problems like mushy or undercooked rice with simple solutions.
Conclusion
Mastering the perfect water-to-grain ratio in your rice cooker is the cornerstone of consistently producing delicious, perfectly textured grains. By understanding the specific needs of each grain type, utilizing your rice cooker’s specialized measuring cup, and implementing essential preparation techniques like rinsing and resting, you elevate a simple staple to a culinary delight. Your rice cooker is a powerful ally in the kitchen, designed to free up your time and deliver outstanding results. So, go ahead, experiment with confidence, and discover the joy of perfectly cooked grains every single time. What new grain will you conquer in your rice cooker next?
 An appealing image of perfectly cooked, fluffy rice and various other grains served beautifully from a rice cooker.
Frequently Asked Questions
Should I rinse rice for a rice cooker?
Yes, for most white rice varieties like jasmine and basmati, rinsing is highly recommended. It removes excess surface starch, which is the main cause of gummy or clumpy rice, resulting in a fluffier texture. Exceptions include enriched rice (to preserve nutrients) and Arborio rice (where starch is desired for creaminess).
Can I use a regular measuring cup for my rice cooker?
It is strongly advised to use the measuring cup that came with your rice cooker. This cup is typically 180ml, while standard kitchen measuring cups are 240-250ml. Your rice cooker’s internal water level markings are calibrated to the smaller, 180ml cup, so using a different size will lead to incorrect water ratios and potentially poorly cooked rice.
How do I prevent sticky rice in my rice cooker?
To prevent rice from sticking, ensure you rinse your rice thoroughly before cooking to remove surface starches. Adding a small amount of oil or butter (about a teaspoon per cup of rice) to the water can also help. After cooking, let the rice rest on the “Keep Warm” setting for 10-15 minutes with the lid on, allowing moisture to redistribute evenly before fluffing.
What’s the best water ratio for brown rice?
For most brown rice varieties, a water-to-rice ratio of 1:1.5 is a good starting point. However, for long-grain brown rice, some experts recommend a slightly higher ratio of 1:2.25. Soaking brown rice for 20-30 minutes before cooking can also help it absorb water more effectively and result in a more tender texture.