There’s little more disheartening for a home cook than opening the lid of a perfectly cooked batch of rice, only to find a stubborn, burnt layer stuck to the bottom of the pot. This common kitchen woe not only wastes food but also adds the dreaded task of scrubbing a scorched pan. While rice cookers are designed to simplify meal preparation, a few common factors can turn your fluffy grains into an unappetizing crust. Understanding these underlying causes and implementing simple solutions can transform your rice-cooking experience, ensuring consistently perfect results every time. This guide will walk you through the reasons behind your rice cooker burning the bottom layer and equip you with practical tips to prevent it.
Understanding Why Your Rice Cooker Burns the Bottom Layer
Many home cooks find themselves scratching their heads when their trusty appliance, designed specifically for cooking rice, consistently fails to deliver a perfectly cooked batch without a burnt bottom. The issue often stems from a combination of the fundamental physics of rice cooking and common user habits.
The Science Behind the Scorch
|
Our Picks for the Best Rice Cooker in 2026
As an Amazon Associate I earn from qualifying purchases.
|
||
| Num | Product | Action |
|---|---|---|
| 1 | COMFEE' Compact Rice Cooker, 6-in-1 Stainless Steel Multi Cooker, Slow Cooker, Steamer, Saute, and Warmer, 2 QT, 8 Cups Cooked(4 Cups Uncooked), Brown Rice, Quinoa and Oatmeal, 6 One-Touch Programs |

|
| 2 | AROMA® Mini Rice Cooker, 2-Cup (Uncooked) / 4-Cup (Cooked), Grain Cooker, Soup Maker, Oatmeal Cooker, Auto Keep Warm, 1 Qt, Light Green |
|
| 3 | BLACK+DECKER Rice Cooker 6-Cup (Cooked) with Steaming Basket, Removable Non-Stick Bowl, White |
|
| 4 | AROMA® Mini Rice Cooker, 2-Cup (Uncooked) / 4-Cup (Cooked), Grain Cooker, Soup Maker, Oatmeal Cooker, Auto Keep Warm, 1 Qt, Milk Tea color |
|
| 5 | Instant Pot 4QT RIO Mini 7-in-1 Multi-Cooker, Pressure Cooker, Slow cook, Sauté, Steam, Rice Maker, Yogurt, & Warmer, Sea Salt, 4 Quarts |
|
| 6 | COSORI Rice Cooker 10 Cup, 24h Keep Warm, Non-stick Ceramic Inner Pot, 18 Functions Fuzzy Logic Rice Maker with Stainless Steel Steamer Basket, Sauté, Slow Cooker, Black |
|
| 7 | Zojirushi Micom 3-Cup Compact Size, Multiple Settings, Stainless Steel Made, Built-In Retractable Power Cord and Easy to Transport Rice Cooker and Warmer |
|
| 8 | AROMA® Select Stainless® Rice Cooker, 3-Cup (Uncooked) / 6-Cup (Cooked), Stainless Steel Inner Pot, Small Rice Cooker, Auto Keep Warm, 1.2 Qt, White, ARC-753SG |
|
| 9 | Aroma Housewares 4-Cups (Cooked) / 1Qt. Rice & Grain Cooker (ARC-302NGBL), Blue |
|
| 10 | AROMA Digital Rice Cooker, 4-Cup (Uncooked) / 8-Cup (Cooked), Steamer, Grain Cooker, Multicooker, 2 Qt, Stainless Steel Exterior, ARC-914SBD |
|
A rice cooker works by heating water to a boil, which the rice then absorbs. Once the water is fully absorbed, the temperature inside the cooker rapidly rises, signaling the appliance to switch from “cook” to “warm” mode. The heating element, typically located at the bottom of the cooker, is the most intense heat source. If the rice at the very bottom loses all its moisture and remains in direct contact with this element for too long, it will inevitably scorch. This can happen even if the rest of the rice appears perfectly cooked, as the bottom layer is the first to dry out and the last to release from the heat.
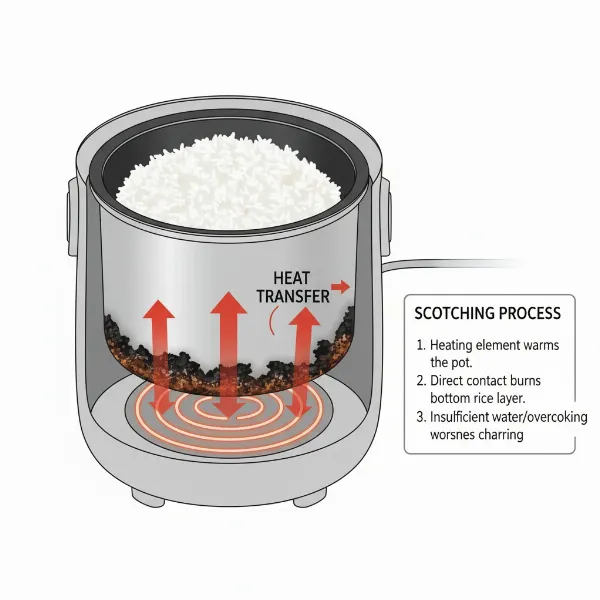 Diagram illustrating how a rice cooker's heating element burns the bottom layer of rice.
Common Culprits: Causes of Burnt Rice
Several factors can contribute to your rice cooker burning the bottom layer, ranging from simple user error to subtle issues with the appliance itself. Identifying the specific cause is the first step toward finding a lasting solution.
- Insufficient Water: This is perhaps the most common reason. If there isn’t enough water to be fully absorbed by the rice before the “cook” cycle ends, the bottom layer will quickly dry out and burn.
- Overcooking or Prolonged “Warm” Setting: Many rice cookers automatically switch to a “warm” setting after cooking. While useful for keeping rice ready, leaving it on this setting for an extended period can continue to cook the rice, gradually browning and eventually burning the bottom. Some cheaper models may have an overly aggressive “warm” function.
- Too Little Rice for the Cooker: Cooking a very small amount of rice in a large-capacity rice cooker can concentrate the heat disproportionately on the small layer of grains at the bottom, leading to quicker burning.
- Excess Starch (Lack of Rinsing): Unrinsed rice releases a significant amount of starch into the cooking water. This starch can create a sticky, glue-like layer at the bottom of the pot, which adheres to the surface and is more prone to scorching when it dries out.
- Cooker Malfunction or Design Flaw: In some cases, the problem might lie with the rice cooker itself. A faulty thermostat, an uneven heating element, or simply a poorly designed, inexpensive model can lead to inconsistent cooking and burnt rice.
- Adding Fats or Broths: While adding butter, oil, or broth can enhance flavor, these ingredients, especially those with higher fat content, can sometimes cause the rice to “fry” or burn more easily at the bottom, particularly if used in excessive amounts or with an already hot heating element.
Practical Solutions to Prevent Burnt Rice in Your Rice Cooker
Achieving consistently fluffy, perfectly cooked rice without a burnt bottom is entirely possible with a few adjustments to your technique and a better understanding of your appliance. These practical steps can help you troubleshoot and prevent future occurrences of scorched rice.
Master the Water-to-Rice Ratio
The water-to-rice ratio is fundamental to perfect rice. Always refer to your rice cooker’s manual, as ratios can vary by model and rice type. As a general guideline, for most white rice, a 1:1 or 1:1.25 rice-to-water ratio is common, but some rice varieties like brown rice or basmati may require more water. If your rice consistently burns, try adding a tiny bit more water than the standard recommendation—about an extra tablespoon per cup of rice—to provide a buffer against drying out too quickly.
The Art of Rinsing Rice
Rinsing your rice thoroughly before cooking is a game-changer for preventing a burnt bottom layer. Rice grains have excess starch on their surface, which, when released during cooking, can create a sticky, glue-like film at the bottom of the pot. This starchy layer is more prone to sticking and burning. Rinse your rice under cold running water in a fine-mesh sieve until the water runs mostly clear, rather than cloudy. This process removes surface starch and results in separate, fluffier grains, reducing the likelihood of them sticking and scorching.
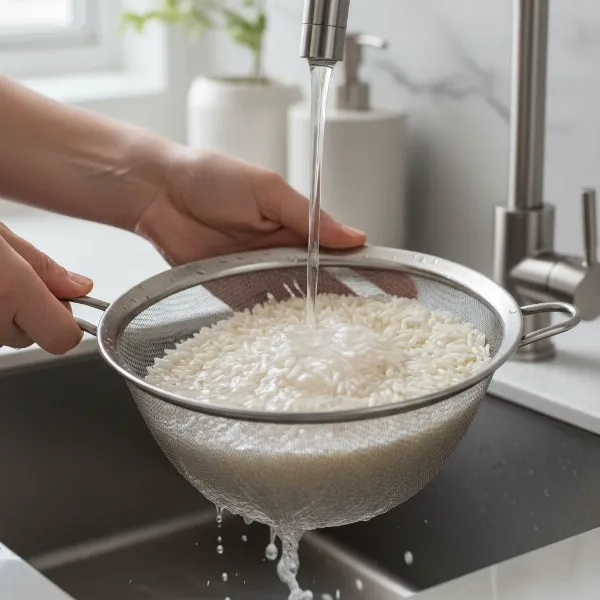 Hands rinsing white rice in fine-mesh sieve under cold running water, kitchen sink.
Optimize Post-Cooking Handling
How you handle your rice immediately after the “cook” cycle is crucial. Once the rice cooker switches to its “warm” setting, the heating element is still active, albeit at a lower temperature.
- Unplug Immediately: To completely stop the cooking process and prevent further browning, unplug your rice cooker or remove the inner pot from the heating base as soon as it clicks to “warm.”
- Allow for “Rest” or “Steaming” Time: After cooking, leave the lid on for an additional 10-15 minutes, even after unplugging. This allows the residual steam to evenly distribute moisture throughout the rice and helps the grains at the bottom naturally release from the pot, preventing sticking and burning.
- Gentle Fluffing: After the resting period, gently fluff the rice with a plastic or wooden paddle. Avoid metal utensils, which can scratch non-stick coatings and exacerbate sticking problems over time.
Choosing the Right Quantity
Cooking an appropriate amount of rice for your cooker’s size can significantly impact the outcome. If you consistently cook very small portions in a large-capacity rice cooker, the concentrated heat on a thin layer of rice can lead to rapid drying and burning. If your household only needs small quantities of rice, consider using a smaller, more appropriately sized rice cooker. This ensures the heating element can distribute heat effectively across the entire batch, reducing the risk of a burnt bottom layer.
Experiment with Additives and Water Temperature
While additives can enhance flavor, they sometimes contribute to burning. If you add butter, oil, or broth, try reducing the amount or, for butter/oil, consider stirring it in after the rice has cooked and rested. Some users find that starting with cold water instead of lukewarm or hot water can give the rice a slightly longer cooking time before the bottom dries out, helping to prevent scorching. Experiment with these variables to see what works best for your specific rice cooker and rice type.
When to Consider a New Rice Cooker
Sometimes, despite all troubleshooting efforts, the problem of burnt rice persists. In such cases, the issue might lie beyond your cooking technique and within the appliance itself. Recognizing these signs can help you decide when it’s time to invest in a new, more reliable rice cooker.
Signs of a Faulty Rice Cooker
Even well-maintained rice cookers can develop issues over time. Consistent burning, even after diligently applying all the aforementioned tips, can be a strong indicator of a problem.
- Inconsistent Burning Despite Troubleshooting: If you’ve tried adjusting water ratios, rinsing rice, and unplugging immediately, yet the bottom still consistently burns, your cooker’s internal sensors or heating elements might be malfunctioning.
- Aggressive “Warm” Setting: Some lower-end rice cookers have a “warm” setting that is simply too hot, continuing to cook the rice at a temperature that will eventually brown and burn the bottom layer rather than just keeping it warm.
- Worn Non-Stick Coating: If the non-stick coating on your inner pot is visibly scratched, flaking, or worn out, rice will naturally stick more easily, making it highly susceptible to burning. This significantly reduces the pot’s effectiveness.
Investing in Quality
A higher-quality rice cooker often comes with advanced features that mitigate the risk of burnt rice. These models are typically equipped with more precise temperature controls, often utilizing induction heating (IH technology), which provides even heat distribution not just from the bottom but from all sides. This technology prevents hot spots and ensures that the rice cooks uniformly. Brands like Zojirushi, Tiger, and Panasonic are renowned for their consistent performance and advanced features, which include specialized settings for various rice types and better “warm” temperature management, ensuring your rice stays perfect for longer without burning. While a higher initial investment, a quality rice cooker can save you frustration, wasted food, and cleaning effort in the long run.
Maintaining Your Rice Cooker for Optimal Performance
Proper maintenance of your rice cooker is essential not only for extending its lifespan but also for ensuring consistent, non-burnt rice. A well-cared-for appliance performs better and provides more reliable cooking results.
Cleaning the Inner Pot
The inner pot, especially if it’s non-stick, requires careful cleaning. After each use, let the pot cool completely before washing it. Use a soft sponge or cloth and mild dish soap. Avoid abrasive scrubbers, metal utensils, or harsh chemicals, as these can damage the non-stick coating. A damaged non-stick surface is a primary culprit for rice sticking and burning, making gentle care paramount. If rice is stuck, soak the pot in warm, soapy water for a while to loosen it before gently wiping it clean.
General Care Tips
Beyond the inner pot, the rest of your rice cooker also benefits from routine care.
- Keep Heating Plate Clean: Ensure the heating plate at the bottom of the cooker base is clean and free of any debris, spilled rice, or moisture. A clean contact surface ensures efficient heat transfer.
- Proper Storage: Store your rice cooker in a dry place. When not in use, ensure the inner pot is clean and dry. Avoid stacking heavy items on top of the cooker to prevent damage to the lid or internal components.
- Check for Wear: Periodically inspect the power cord for any signs of wear or damage. Also, check the lid’s gasket for cracks or stiffness, as a tight seal is vital for proper steam retention during cooking.
Comparison Table: Common Burnt Rice Scenarios & Solutions
Understanding specific scenarios and their corresponding fixes can quickly resolve your burnt rice woes.
| Problem | Primary Cause | Quick Fix |
|---|---|---|
| Rice always hard/burnt at bottom | Insufficient water | Add 1-2 tablespoons more water per cup of rice; check manual’s ratio. |
| Bottom layer browned/crusty after hours | Prolonged “Warm” setting | Unplug cooker immediately after the “cook” cycle finishes, let rest for 10-15 minutes. |
| Rice sticks and burns fiercely | Excess starch / Damaged non-stick coating | Rinse rice until water runs clear; use soft utensils; consider replacing pot if coating is worn. |
| Burnt spots when cooking small amounts | Too little rice for cooker’s capacity | Cook larger batches, or consider a smaller rice cooker for single servings. |
| Rice tastes “fried” at the bottom | Excessive fats (oil/butter) or heavy broth | Reduce fat/broth; add fats after cooking; use cold water for initial cooking. |
| Consistent issues despite adjustments | Cooker malfunction / Poor design | Inspect cooker for damage; consider investing in a higher-quality model. |
“The secret to perfectly cooked rice isn’t just about the right water ratio, but understanding your appliance’s nuances and giving your rice the proper rest it deserves after cooking.” – Lan, Admin, ricecookerhot.com
Conclusion
A burnt bottom layer of rice can be a frustrating and wasteful experience, but it’s a problem with numerous practical solutions. From fine-tuning your water-to-rice ratio and thoroughly rinsing your grains to carefully managing the “warm” cycle and understanding your cooker’s capacity, each step plays a crucial role in preventing scorched rice. Sometimes, the solution might even involve recognizing the limitations of an older or less expensive appliance and considering an upgrade.
By implementing these troubleshooting tips and maintaining your rice cooker with care, you can ensure that every batch of rice emerges fluffy, delicious, and free from undesirable crusts. Don’t let burnt rice diminish your enjoyment of this staple food. With a little attention to detail, perfect rice is well within your reach. What’s your top tip for achieving consistently perfect rice every time?
Frequently Asked Questions
Is some burnt rice normal in a rice cooker?
While a very slight browning or crisping (often called guoba in some cultures) might be intentional in certain specialized settings, a truly burnt, inedible layer is not normal and indicates an issue with your cooking process or the appliance itself.
Can I save burnt rice?
If only the very bottom layer is burnt, you can often save the rest of the rice. Carefully scoop out the unburnt portion from the top and sides, avoiding contact with the scorched layer. The burnt part often carries a strong, unpleasant flavor that can contaminate the entire batch if mixed.
How do I clean a burnt rice cooker pot?
For a burnt pot, fill it with warm water and a few drops of dish soap, then let it soak for several hours or overnight. This will soften the burnt rice, making it much easier to gently scrub away with a non-abrasive sponge. Avoid metal scrubbers to protect the non-stick coating.
Does rinsing rice remove nutrients?
While rinsing does remove some surface starch, it does not significantly strip away essential nutrients from the rice grain itself. The primary benefit is to improve texture and prevent sticking and burning. Additionally, rinsing can help remove impurities and residual arsenic from the rice.
What’s the ideal water-to-rice ratio for fluffy rice?
For most white rice varieties, a common starting point is a 1:1 or 1:1.25 rice-to-water ratio (e.g., 1 cup rice to 1-1.25 cups water). However, this can vary based on the specific type of rice (e.g., brown rice needs more water) and your rice cooker model. Always consult your appliance’s manual for the most accurate recommendation.